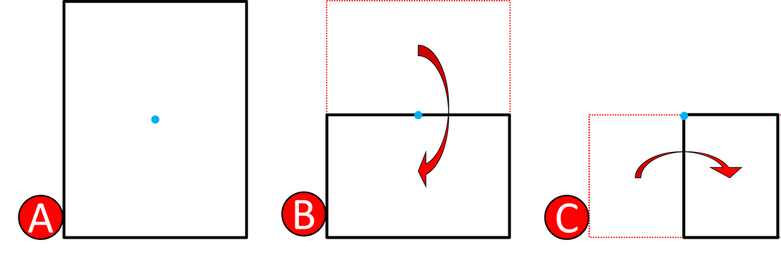
The steps below will quickly enable you to start producing "legit" snowflakes. The blue dot represents the center of the sheet of paper. It is very important to keep track of where the center of the sheet is during steps 1, 2, and 3. Otherwise, your snowflake could be ruined on the very first cut.
|
A printable .pdf of the instructions below can be downloaded here:
|
| ||
1. Fold the paper into quarters, making sure to be aware of which corner of the paper contains the center of the sheet (blue dot). Put the quartered sheet in front of you, with the center of the sheet at the top left corner.
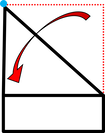
2. Fold down the top right corner until the top edge is in line with the left edge. Now, the center of the sheet will be at the point formed by this fold.
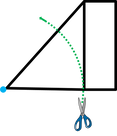
3. Holding the point with one hand, make the "pizza cut."
[My students named it.]
[My students named it.]
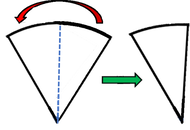
4. Unfold into a semicircle. Then, re-fold it into thirds.
[When you unfold it, the semicircle is divided into 4 wedges, each with 45⁰ of arc. Once re-folded, the wedge will be an arc of 60⁰.]
[When you unfold it, the semicircle is divided into 4 wedges, each with 45⁰ of arc. Once re-folded, the wedge will be an arc of 60⁰.]

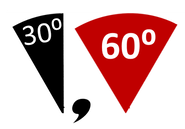
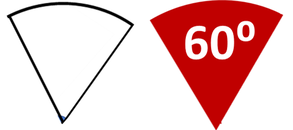
Now you have a "blank." If folded correctly, the angle at the bottom is 60⁰, 1/6 of a circle.
This is the basic form from which your snowflakes will be cut. Gallery images marked with the red wedge use this kind of blank.
This is the basic form from which your snowflakes will be cut. Gallery images marked with the red wedge use this kind of blank.
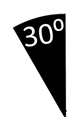
6. Fold in half to create a 30⁰ angle.
[These are great for making snowflakes with 12+ arms or features.]
[These are great for making snowflakes with 12+ arms or features.]
Gallery images marked with the black wedge use a 30⁰ blank.
Images tagged with both of these symbols require the first few cuts on the 30⁰ blank, which is then unfolded to 60⁰ before the rest of the cuts are made. [The cuts made on the spine of the 30⁰ blank will appear in the center of the 60⁰ blank.]